Learn how to create a QR code in Trinity Guard®, download it as a printable file, and attach it to the QR-code subtask of a patrol task.
A QR code acts as an indoor checkpoint wherever GPS-based verification isn't precise or practical enough. Once the QR code is created, an administrator can attach it to a patrol task subtask, so the guard verifies their presence on site by scanning the code.
Add QR codes after the patrol task structure is ready
In Trinity Guard®, a QR code is a checkpoint that the security guard scans with the mobile app. It's especially useful at indoor locations, entrances, warehouse gates, hallways, reception desks, or any point where GPS coordinates alone don't provide precise enough proof.
The setup logic is simple. First, you create the QR code in the web admin panel. Then you download it, print it, and physically place it in the right location. Finally, inside a task you set the subtask type to Read QR code and select the QR code you created earlier.
In this guide, the QR code is created for the NorthGate Logistics Site – Dallas, TX test environment. The QR code name is:
Loading Dock Entrance QR
The QR code description is:
QR code used by guards to confirm patrol completion at the loading dock entrance.
In this example, we attach this QR code to a patrol task subtask, where the guard has to verify their presence at the Main Gate Check point by scanning the QR code.
✓Creating a QR code from the onboarding panel.
✓Entering the QR code name and description.
✓Confirming successful creation.
✓Viewing and downloading the QR code in the QR codes list.
✓Setting up a QR-code subtask inside a patrol task.
✓Selecting the correct QR code for the task.
✓Confirming the QR code was added to the patrol task.
Workflow
The correct Add QR Code setup path
Setting up a QR code has two parts. The first part is creating the QR code itself. The second part is attaching the QR code to a task.
This matters because on its own, a QR code is just an available checkpoint. It becomes a real patrol verification element only when you select it as a task subtask.
1Open Add QR CodeOpen Add QR Code from the onboarding panel or the QR codes menu.
2Open the empty QR code formReview the empty Add QR Code form.
3Enter QR code detailsEnter the QR code name and an optional description.
4Click Add QR CodeClick the Add QR Code button to create the QR code.
5Confirm successConfirm the success message.
6Review the QR code cardReview the created QR code in the QR codes list.
7Select Read QR code in a taskIn a patrol task subtask, set the subtask type to Read QR code.
8Attach the QR code to the subtaskSelect the correct QR code, then confirm it appears inside the task.
Interactive walkthrough
How to add a QR code step by step
Follow the real Trinity Guard® QR code setup process. The steps first show how to create the QR code, then how to attach it to a patrol task subtask.
us.trinity-guard.com/dashboard/objects
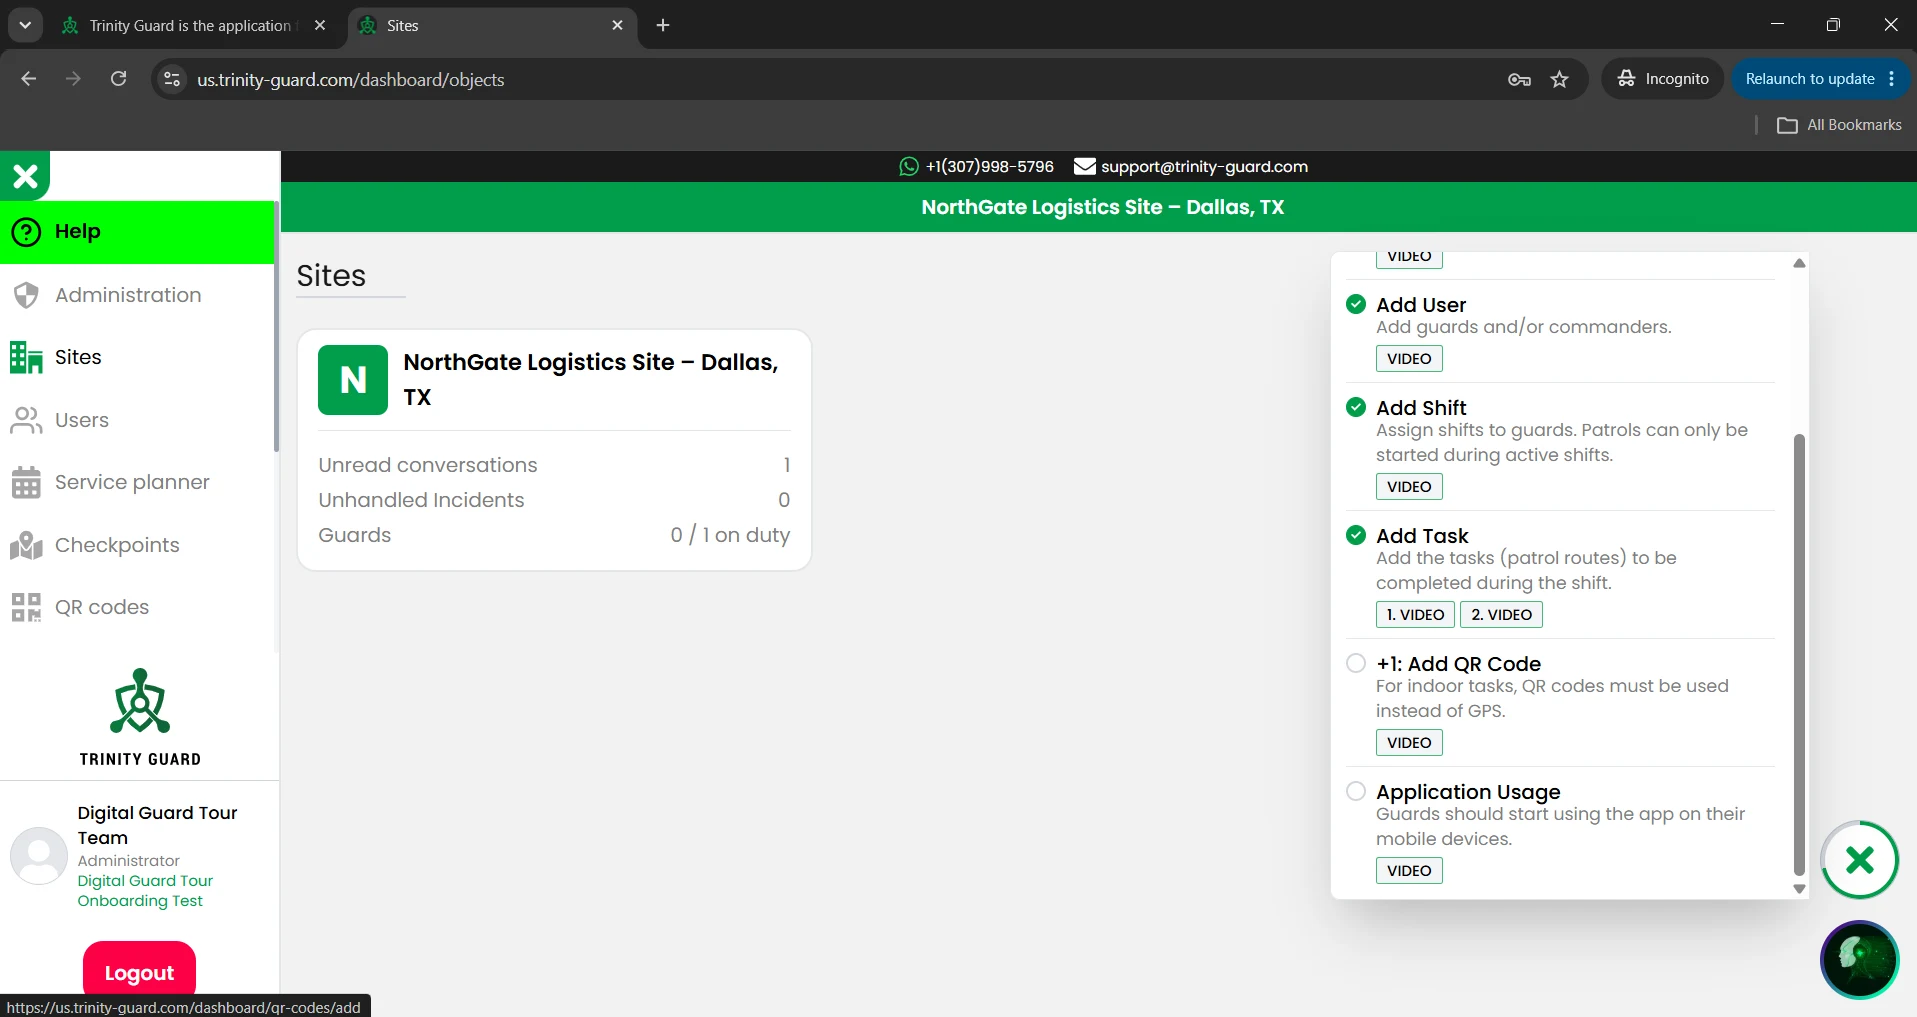
Step 1: Open Add QR Code from the onboarding panel
On the Sites page, the onboarding panel shows that the next available add-on step is +1: Add QR Code. Click the Add QR Code step. This opens the QR code creation page.
Detailed guide
Create a QR code and assign it to a patrol task
QR code setup is most useful when you tailor it to how the site operates. A generic name isn't enough. Make the QR code name location-specific, because you'll identify it by that name later in tasks, reports, and administrator reviews.
1
Select Add QR Code in the onboarding checklist
The Trinity Guard® onboarding panel helps you work through the first setup steps.
Once the site, user, shift, and task basics are set up, the system offers to add a QR code.
Click +1: Add QR Code.
This step matters when you want indoor or precise location-bound verification. Examples include a warehouse entrance, reception, machine room, hallway, stairwell, or loading gate.
2
Open the Add QR Code form
The Add QR Code page displays a simple form.
The Name of the QR Code field determines the name the QR code appears under in the system.
The Description of the QR Code field is optional, but worth filling in. The description helps you understand later exactly where the QR code is located and what patrol verification purpose it serves.
3
Use a clear location-based QR code name
Don't use a generic QR code name.
Avoid names like:
QR 1 Test QR Checkpoint QR
Instead, use a precise, location-bound name:
Loading Dock Entrance QR
This name immediately shows that the QR code belongs to the loading dock entrance.
4
Add a short operational description
The description isn't required, but it's strongly recommended.
For example:
QR code used by guards to confirm patrol completion at the loading dock entrance.
This description also makes it clear to the supervisor later that the QR code isn't decoration — it's part of patrol verification.
5
Click Add QR Code and confirm success
After filling in the fields, click the Add QR Code button.
After a successful save, the system displays a confirmation message:
QR Code successfully created.
This indicates the QR code is ready and can be used in the system.
6
Download and print the QR code
After you create the QR code, its card appears in the QR codes list.
Use the Download QR Code button to download the QR code.
The downloaded QR code can be printed, laminated, and placed at the right physical location.
Best practice is to keep the QR code clearly visible and easy to reach, but not easy to confuse with other QR codes.
7
Use Read QR code inside a patrol task
A QR code becomes a checkpoint when you attach it to a patrol task subtask.
For the subtask type, select:
Read QR code
This means the guard has to scan the QR code to complete the task.
This is especially important for indoor tasks, because GPS isn't always precise enough at indoor locations.
8
Attach the correct QR code to the subtask
In the QR code field, select the correct QR code:
Loading Dock Entrance QR
Then confirm that the QR code preview appears inside the task.
Once the correct QR code is visible, the subtask setup is complete.
QR code setup note: A QR code isn't the same as a GPS checkpoint. A GPS checkpoint uses location coordinates. A QR code proves physical presence at a specific location, because the guard has to scan the code posted on site. At indoor or covered locations, a QR code is generally a more reliable method of proof than GPS-based verification on its own.
Atomic truths
Short operational rules for QR codes
A QR code works as an indoor checkpoint.
A QR code must be created first, then attached to a task.
A QR code name should be location-specific.
A QR code description helps with administrator identification.
A QR code must be downloaded, printed, and posted on site.
A Read QR code subtask requires the guard to scan a QR code.
The selected QR code determines which physical point must be scanned.
A QR code is useful indoors, where GPS isn't precise enough.
QR-code completion proves the guard was at the correct point.
A supervisor can review completion later based on the QR-code subtask.
Security isn't logged. It's proven.
If it's not verified, it didn't happen.
Real patrols. Real data. Real proof.
Operational logic
Why QR codes matter in patrol verification
The goal of patrol verification isn't just for the guard to start a task. The goal is for the system to produce verifiable data showing the guard was at the correct on-site point.
GPS works well outdoors, but indoors — in warehouses, hallways, gateways, or large buildings — it isn't always precise enough. In these cases, QR-code verification provides stronger proof.
The QR code is physically on site. When the guard scans it, it means they reached the designated point.
This approach is especially useful in logistics centers, office buildings, factories, warehouses, shopping centers, campuses, and anywhere indoor verification matters.
Common mistakes
Common QR code setup mistakes to avoid
✓Do not use vague QR code names. Don't use generic names like QR 1 or Test QR. Keep the name location-bound.
✓Do not forget to download and print the QR code. A QR code created in the system is only usable on site if it's also physically posted.
✓Do not attach the wrong QR code to the subtask. Always confirm that the correct QR code is selected for the subtask.
✓Do not confuse QR codes with GPS checkpoints. A GPS checkpoint is tied to coordinates. A QR code is tied to a physical scan.
✓Do not place QR codes where guards cannot access them easily. Keep the QR code easy to reach, clearly visible, and easy to scan.
✓Do not use QR codes without clear operational purpose. Every QR code should have a specific verification purpose.
FAQ
QR code questions
What is a QR code in Trinity Guard®?
A QR code is a checkpoint that the guard scans with the Trinity Guard® mobile app to complete a task.
When should I use QR codes instead of GPS checkpoints?
Use QR codes when you need precise indoor or physical on-site verification — for example at entrances, warehouses, hallways, or reception points.
Is the QR code name important?
Yes. The QR code name appears in the admin panel and in tasks, so it's best to use a clear, location-specific name.
Is the QR code description required?
It's not required, but recommended. The description helps you understand later where the QR code is located and what verification purpose it serves.
Can I download the QR code?
Yes. You can download the QR code with the Download QR Code button in the QR codes list.
What should I do after downloading the QR code?
Print it, laminate it, or post it in a durable form at the right on-site point.
How do I use a QR code in a patrol task?
In the patrol task subtask, select the Read QR code type, then select the QR code you created earlier.
Can one QR code be used in multiple tasks?
Yes, if you want to use the same physical on-site point in multiple tasks.
What happens when the guard scans the QR code?
The system links the QR code scan to subtask completion, proving the guard was at the correct point.
Is QR code verification useful for indoor patrols?
Yes. For indoor patrols, QR-code verification is especially useful, because GPS accuracy can be limited inside buildings.
Can a QR code be edited later?
Yes. In the QR codes list, you can change the QR code name or description with the Edit QR Code button.
Can a QR code be deleted?
Yes. It can be deleted with the Delete QR Code button, but only do this once you're sure it's no longer needed in existing or future tasks.
Next step
Your first QR code checkpoint is ready for testing
Once the QR code is created, the system is ready for you to use it in a real patrol task.
The correct order of operations:
first, you create the QR code, download it and post it on site, then, in the patrol task subtask, you select the Read QR code type, and attach the correct QR code.
At that point, the QR code is no longer just a downloadable code — it's part of patrol verification.
Start with a single well-defined QR code, test the scan in the mobile app, and then expand the system with additional indoor checkpoints.
Gyula GyörfiSecurity technology expert, veteran police commander, and founder of Trinity Guard LLC. This setup guide is based on the real Trinity Guard® QR Code onboarding flow used to create QR checkpoints, download printable QR codes, and attach QR verification to patrol task subtasks.
Privacy
Cookie settings
Analytics only with consent
DigitalGuardTour.com uses essential cookies and similar technologies
to operate this website, remember your choice, and help protect forms from spam or abuse.
Optional analytics starts only if you allow it.
Essential operation
Required for basic site functionality, remembering your cookie choice,
and form security. This cannot be turned off.
Always active
Site analytics
Helps us understand which pages are visited, what devices are used,
and how visitors find the website. This is enabled only with your consent.